Sometimes you may want to create temporary login details in WordPress in a situation when you will need to provide an account login to another person. (e.g a developer or an author).
Why to create temporary login details
If you have several websites hosted on your hosting, you will not want other people to access your data.
In this case, you may need to create temporary accounts to provide website login access.
How to create temporary login details
There are several ways to do that.
In this article, we will guide you through all the ways on how to create temporary logins for your WordPress website.
- Creating new users via WordPress admin dashboard
- Generating temporary admin access link using a plugin
Creating new users via WordPress admin dashboard
First, you will need to login into the WordPress Admin Dashboard. Navigate to the Users menu. Click on “Add New”

It will show up an Add New User form. After Filling out the necessary fields Click on the “Add New User” button.
Note: Make sure to set the proper user role for the person you want to add. If you have no idea what permissions a user role has, you can check from this link WP Roles and Capabilities
After successfully adding a user account, you will need to provide the username and password to the person you wanted to give access of your website.
The user can log in with the username and password from their device with the admin login URL (e.g. https://yourwebsite.com/wp-admin)
Go to Users > All Users to check all the login details you have created in WordPress.

Generating temporary admin access link using a plugin
This method is quite useful in a situation when you forgot to remove the persons from the User list after fishing the job on your WordPress website. The temporary admin access link doesn’t work after a certain period.
So let’s jump on the tutorials on how to do it.
First, from your Dashboard, you will need to go to Plugins > Add New.

Search for the “Temporary Login Without Password” plugin. You will need to click on Install now and then Activate it.
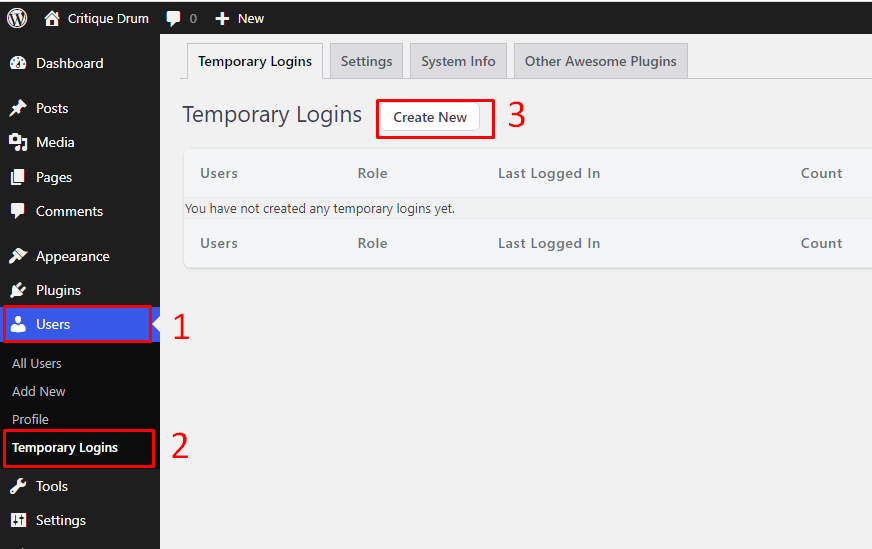
Upon activation, navigate to Users > Temporary Logins page.
Add a new temporary login account by clicking on the Create New button.
You will see a form appears on this page. You need to fill out this form for creating temporary login
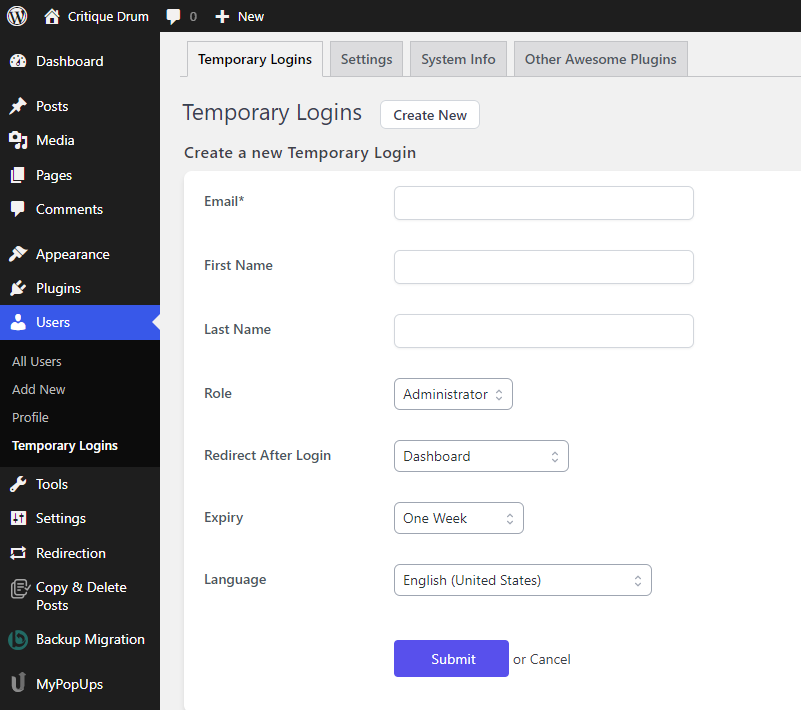
- Enter the Email, First Name, and Last Name of the user or person you want to add.
- Next, Select a user role from the dropdown.
- Then, you need to select an expiry duration from the dropdown. The access to the user account will expire after that duration.
- You also can set a default language for this temporary login from the Language option.
Click on Submit button after filling out this form.
Now You will be redirected to the page where you can see a success message and a URL.
You will need to copy the URL by clicking “Click to Copy” button and share it to the person you want to give temporary login access.
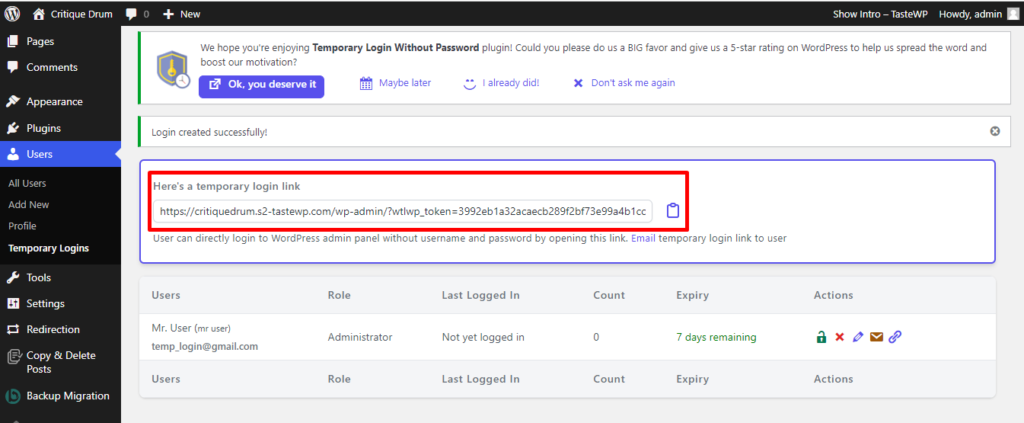
The login account will automatically expire after the expiry period you have selected.
Managing Temporary Logins
You can see all temporary login user list and their expiry duration from Users > Temporary Logins page till the account expires.

From the Action column, you can disable an account, delete an account, and update the account expiry time and role capabilities.
All the posts and pages created by the user will be changed to the administrator as an author after the temporary account is permanently deleted.
Conclusion
Hope this article helped you to create temporary login details to your WordPress website.
Check out our other blogs on various WordPress Tips and Tricks we have published.


Leave a Reply