

If you’re ready to launch an online store, WooCommerce remains one of the smartest choices you can make. It’s free, incredibly flexible, and powers millions of stores worldwide. But if you’ve never set it up before, the process can feel overwhelming.
This guide walks you through exactly how to set up WooCommerce in 2026 — from installing WordPress to publishing your first product — in a clear, step-by-step format that anyone can follow.
What Is WooCommerce and Why Use It in 2026?
WooCommerce is a free, open-source eCommerce plugin for WordPress. It transforms any WordPress website into a fully functional online store with product listings, shopping carts, checkout pages, and payment processing.
In 2026, WooCommerce continues to dominate the eCommerce landscape for several key reasons:
- It’s completely free to install and use
- It gives you full ownership of your store and data
- It integrates with thousands of plugins and themes
- It offers unmatched flexibility for customization
- It’s built with SEO in mind from the ground up
Whether you’re selling physical products, digital downloads, or services, WooCommerce can handle it all.
What You Need Before You Start

Before diving into the setup process, make sure you have the following in place:
1. A Domain Name — Your store’s web address (e.g., yourstore.com). Choose something short, memorable, and relevant to your niche.
2. Web Hosting — WooCommerce requires WordPress hosting. In 2026, top-rated options include SiteGround, Bluehost, Hostinger, and Kinsta. Look for hosting that offers one-click WordPress installation.
3. An SSL Certificate — Essential for any eCommerce site. Most hosting providers include a free SSL certificate. This encrypts customer data and builds trust at checkout.
4. A WordPress Installation — WooCommerce runs on WordPress, so you’ll need WordPress installed first. Most hosts make this a one-click process.
Once these are in place, you’re ready to set up WooCommerce.
Step-by-Step: How to Set Up WooCommerce in 2026
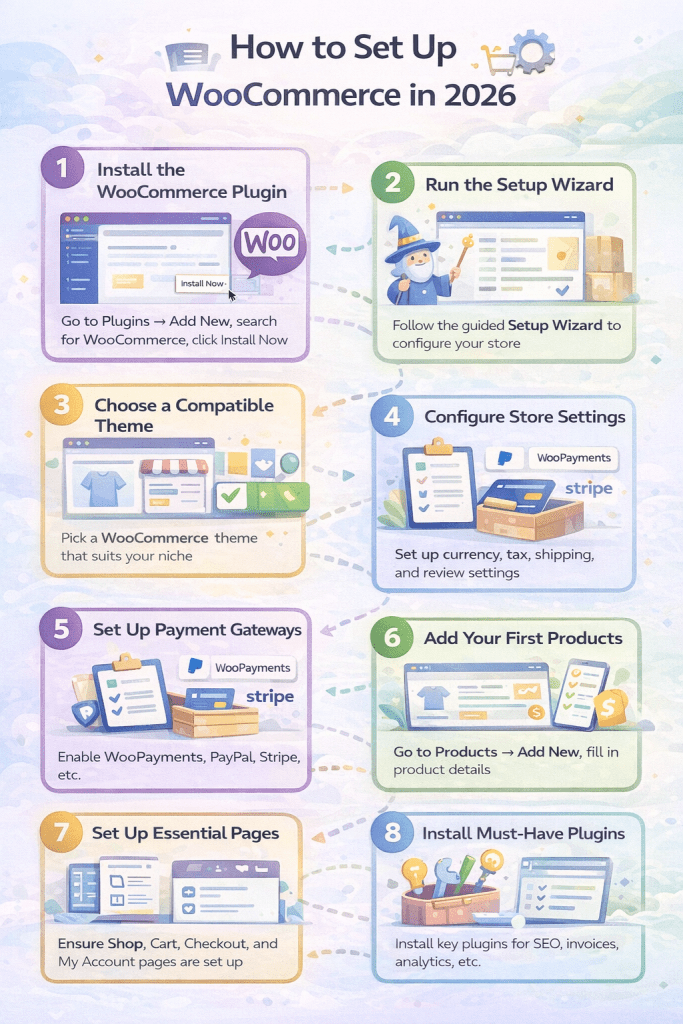
Step 1: Install the WooCommerce Plugin
Log into your WordPress dashboard and follow these steps:
- Go to Plugins → Add New
- Search for “WooCommerce” in the search bar
- Click Install Now next to the official WooCommerce plugin by Automattic
- Once installed, click Activate
After activation, WooCommerce will launch its Setup Wizard automatically. This guided walkthrough makes configuration much easier for beginners.
Step 2: Run the WooCommerce Setup Wizard
The Setup Wizard is your best friend as a new store owner. It covers all the essential settings in one flow.
Store Details Enter your store’s country, address, and currency. This information is used for tax calculations and payment settings, so accuracy matters here.
Industry Selection Choose the category that best fits your business — fashion, electronics, food, digital products, and so on. WooCommerce uses this to suggest relevant features and extensions.
Product Types Select what you plan to sell: physical products, digital downloads, subscriptions, or bookings. You can always add more product types later.
Business Details WooCommerce will ask how many products you plan to sell and whether you’re already selling elsewhere. Answer honestly — this helps tailor the setup recommendations.
Theme Selection You can choose a WooCommerce-compatible theme at this stage or skip it if you already have one installed. We’ll cover theme selection in more detail below.
Step 3: Choose a WooCommerce-Compatible Theme
Your theme controls how your store looks and feels. In 2026, some of the best WooCommerce themes include:
- Astra — Lightweight, fast, and highly customizable
- Kadence — Great for beginners with a powerful free version
- Flatsome — Popular for fashion and lifestyle stores
- Divi — Flexible drag-and-drop builder with WooCommerce support
- Storefront — The official WooCommerce theme, minimal and reliable
To install a theme, go to Appearance → Themes → Add New and search for your preferred option. Choose a theme that loads fast, looks clean on mobile, and supports your product layout needs.
Step 4: Configure Your Store Settings
Once the wizard is complete, head to WooCommerce → Settings to fine-tune your store configuration.
General Settings
- Set your selling location (which countries you ship to)
- Enable or disable customer reviews
- Configure currency and currency position
- Set your store’s base address
Products Settings
- Define how products are displayed (shop page, category pages)
- Enable product reviews and ratings
- Set measurement units for weight and dimensions
Tax Settings
- Enable tax calculations if applicable in your region
- Configure tax rates by country or state
- Choose whether prices are displayed with or without tax
Shipping Settings
This is one of the most important sections. Set up your shipping zones — geographic regions where specific shipping rates apply. For each zone, add shipping methods:
- Flat rate — A fixed shipping cost per order
- Free shipping — Great for promotions or order minimums
- Local pickup — For stores with a physical location
In 2026, integrating real-time shipping rates from carriers like UPS, FedEx, or USPS is possible through official WooCommerce extensions.
Step 5: Set Up Payment Gateways
No store works without payments. WooCommerce supports a wide range of payment gateways out of the box and through extensions.
Go to WooCommerce → Settings → Payments to configure your options.
Built-in payment options:
- WooPayments — WooCommerce’s native payment solution. Supports cards, Apple Pay, Google Pay, and more with no setup fees
- PayPal — One of the most trusted options globally
- Stripe — Excellent for card payments with a smooth checkout experience
- Bank Transfer (BACS) — For manual bank wire transfers
- Cash on Delivery — Useful for local or in-person sales
For most new stores in 2026, enabling WooPayments and PayPal covers the majority of customer payment preferences. Enable multiple options to avoid losing sales at checkout.
Step 6: Add Your First Products
Now the fun part — adding products to your store.
Go to Products → Add New and fill in the following:
Product Name — Keep it clear, descriptive, and keyword-rich for SEO purposes.
Product Description — Write a detailed description in the main editor. Use your target keywords naturally and focus on benefits, not just features.
Short Description — This appears near the Add to Cart button. Keep it punchy and persuasive.
Product Data Panel — This is where you configure:
- Product type (simple, variable, grouped, external)
- Price (regular and sale price)
- Stock quantity and inventory management
- Shipping weight and dimensions
- Linked products (upsells and cross-sells)
Product Images — Upload a high-quality main product image and a product gallery. Good images directly impact conversion rates.
Product Categories and Tags — Organize your products logically. Well-structured categories also help your store’s SEO performance.
Click Publish when you’re ready to make the product live.
Step 7: Set Up Essential WooCommerce Pages
WooCommerce automatically creates four essential pages during setup:
- Shop — Your main product listing page
- Cart — Where customers review their items
- Checkout — Where customers complete their purchase
- My Account — Customer login and order history
Make sure these pages are accessible from your main navigation. Go to Appearance → Menus to add them to your site’s header menu.
Step 8: Install Must-Have WooCommerce Plugins
A few key plugins will make your store significantly more powerful:
- Yoast SEO or Rank Math — For optimizing your product pages and blog content in search engines
- WooCommerce PDF Invoices — Automatically send invoices with every order
- YITH WooCommerce Wishlist — Lets customers save products for later
- WooCommerce Stripe Gateway — If you’re using Stripe as an additional payment option
- MonsterInsights — Connects Google Analytics to your store for traffic and sales tracking
- Smush or ShortPixel — Image optimization for faster load times
Keep your plugin list lean. Too many plugins can slow down your store and create conflicts.
Step 9: Test Your Store Before Going Live
Before you announce your store to the world, run through a complete test:
- Add a product to the cart
- Proceed through the checkout process
- Complete a test purchase (most payment gateways offer a test/sandbox mode)
- Confirm the order confirmation email is sent
- Check that the order appears in your WooCommerce dashboard
- Test on mobile to ensure the experience is smooth
Fix any issues you find before driving traffic to your store.
Step 10: Launch and Optimize
Once everything checks out, it’s time to go live. Here are a few things to do immediately after launch:
- Submit your sitemap to Google Search Console
- Set up Google Analytics to track visitors and conversions
- Enable caching (via a plugin like WP Rocket or W3 Total Cache) for faster load speeds
- Start building product-focused content to drive organic search traffic
- Share your store on social media and with your email list
WooCommerce setup is just the beginning. The most successful stores continuously test, optimize, and expand their product offerings over time.
Common WooCommerce Setup Mistakes to Avoid
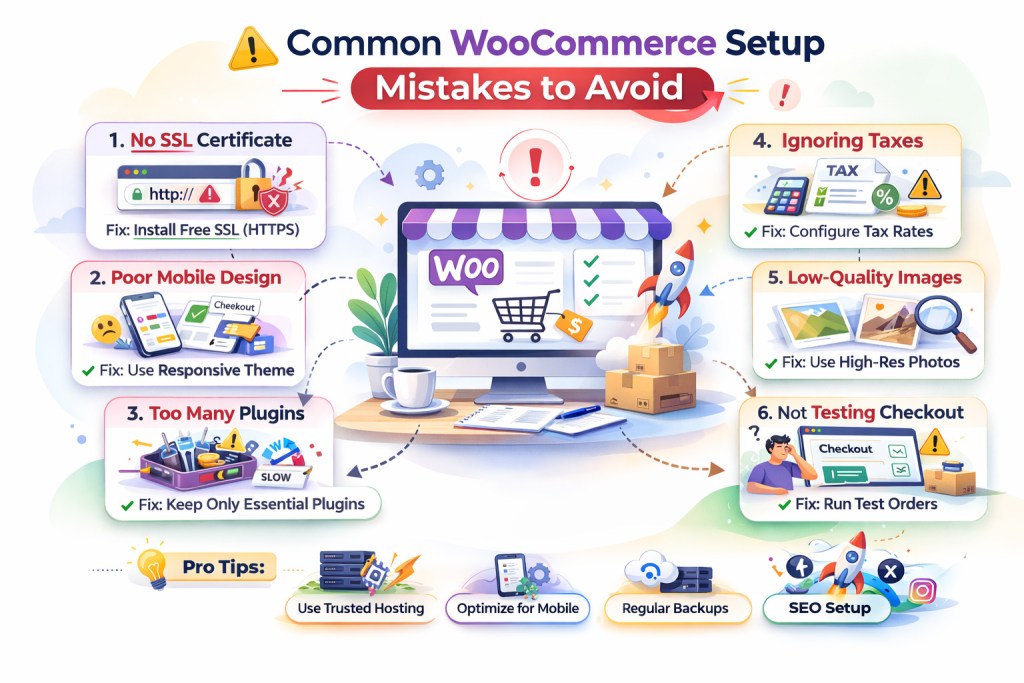
Even experienced users make these mistakes when setting up WooCommerce:
- Skipping SSL setup — Never launch a store without HTTPS. It’s a trust signal and a ranking factor.
- Ignoring mobile optimization — Over 60% of eCommerce traffic comes from mobile devices in 2026.
- Using too many plugins — Each plugin adds load time. Only install what you genuinely need.
- Not configuring taxes correctly — Tax errors can cause compliance issues down the line.
- Poor product images — Low-quality photos kill conversions regardless of how good your product is.
Your WooCommerce Store Starts Here
Setting up WooCommerce in 2026 is more accessible than ever. With the right hosting, a clean theme, and a step-by-step approach, you can have a fully functional online store live within a day.
The key is to start simple, get your store live, and then improve over time. Don’t wait until everything is perfect — your first sale is the most important milestone.
Your store won’t build itself. Start today.
Got stuck during setup? You’re not alone. Drop your question in the comments below and our community of WooCommerce store owners will help you out.


Leave a Reply